 Previous photograph (also Cambridge)
  Next photograph (also Cambridge)
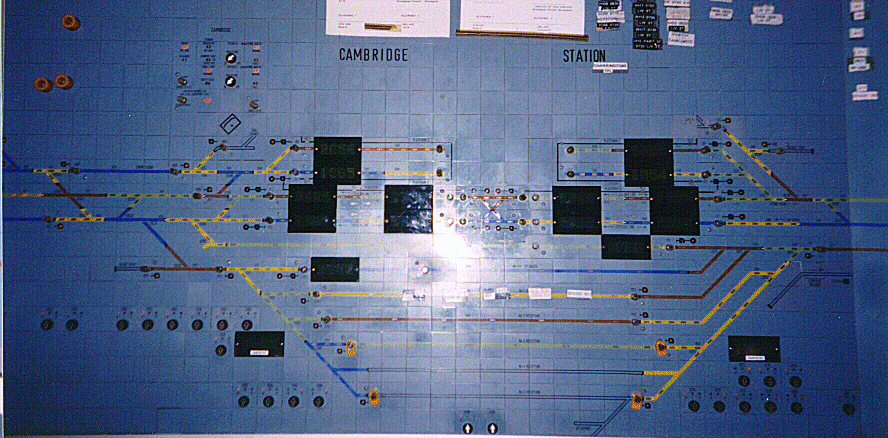
This second view of the panel shows Cambridge station itself.
Let us start with some background items. The panel surface is steel, so that magnets can be used to attach things to it. The red rings at top left are button collars. Placed over a button, they prevent the signaller from pressing it. For example, suppose that a slow load is to be taken over a level crossing. The road driver will phone for permission; when he grants it, the signaller will place collars over the buttons for the signals guarding the crossing. When the road driver phones again to say that he is clear, the collars can be removed. As well as red collars, yellow and green ones are available (though I'm unaware of specific meanings for them).
Printed or handwritten labels can also be attached magnetically. For example, the yellow track circuit near the middle carries labels identifying the various trains sitting on that track.
The switches and lights near the top left are for controlling power to the interlocking within the signal box itself. Underneath it, at an angle, can be seen the symbol representing the signal box and panel itself, in approximate correspondence to its true position (if a signaller facing the panel turns 150 degrees or so to the right, he will be looking out of windows towards the station).
Now to turn our attention to the tracks. Cambridge station consists of four bay platforms, two at each end, and a number of through lines. From top to bottom, they are:
The signals at each end of the bottom double-ended siding actually apply to both of the non-circuited sidings: the points where they merge are hand-worked and indications light up along both arms. The two rotary switches underneath these are nothing to do with them, but are the points keys for the scissors crossover at the centre of the platform line.
Several of the signals, notably the ones at the ends of the platforms, carry subsidiary aspects. These are shown on the symbol, and they light up white when the subsidiary aspect clears (the white dots visible in the photo are probably reflections of the flash, not cleared signals).
Returning to the bays, it can just be seen that trains 2C56 and 1C65 are sitting in the southern bays and 1M54 in one of the northern ones. It may also be possible to see that there is an indicator, labelled "TRS", embedded in the line representing the platform edge, almost at the end. This is the "Train Ready to Start" indication; when platform staff press a button on the station itself, this light flashes to tell the signaller that the train is ready and a route should be set for it as soon as practical.
It is possible to see buttons at the inner end of each bay, not associated with a signal. These are "exit-only" buttons. On Cambridge panel separate buttons are provided for signalling trains into and out of the bays, which are track-circuited throughout while, on the other hand, the same button is used for both functions in the case of the various non-track-circuited sidings. In other words, the "exit" button is placed near the end of the track-circuiting while the "entry" button is placed near the signal, and one or two buttons are used accordingly. Practice on this varies around the country - on other panels it would be normal for a single button to be used for both functions in a bay platform.
The four signals around the scissors crossover in the middle have two buttons each, one with a red rim and one with a yellow one. When setting a route up to these signals, the red button is used (as the "exit" button for the route) to clear the signal in the normal manner, and the yellow button to clear the signal only when the approaching train has almost reached it. The second case (a "warner route") is used where the crossover is not yet in the correct position for the approaching train or where there is another train occupying the track immediately beyond the crossover. If the route is set in the normal manner, the line must be clear for 183m beyond the next signal (a distance known as the "overlap), which in this case means that the crossover points are locked as part of the route setting and the signal can't clear while the other train is there. Choosing the second option allows the overlap to be obstructed, with the delayed yellow warning the driver to take extra care.
The extra buttons on the two goods lines are "wrong direction exit" buttons. If a train is standing on the line and requires a new locomotive, it would have to be signalled on from the opposite end of the line to normal (e.g. in the case of the northbound line, it would be signalled in from the northern end). There is no button at the other end of the line to act as the "exit" button for this route, so this button is used for the purpose. Since there is no signal at the end of the line, it can only be used if the line is occupied.
Arrow symbols can be seen beside the platform and through lines. These lines are bidirectional, and the arrows light up to show which direction route has been set.
One odd feature of the diagram can be seen on the left hand side - the brown track circuit apparently carrying a connection between the two outer tracks across the central one. In fact, there are two separate crossovers leading from the central track, and all four possible combinations of setting are allowed.
The two train-describer berths to the side of the sidings are used for outgoing movements. Since trains signalled into these sidings are almost certain to stay for a while or be broken up and rearranged, the train description is deleted as the train enters the siding. Instead, when a train is ready to depart, a new description is entered by hand on a keyboard and placed (by pressing an appropriate button) into one of these berths. When a train departs in the appropriate direction from any of the sidings, it is assumed to have that description, which is then moved along the diagram in the normal manner.
Previous photograph (also Cambridge) Next photograph (also Cambridge)
 Back to the
photographs index.
Back to the Rail index.
Back to the
photographs index.
Back to the Rail index.
 Back to
Clive's home page.
Back to
Clive's home page.