 Previous photograph
  Next photograph (also Cambridge)
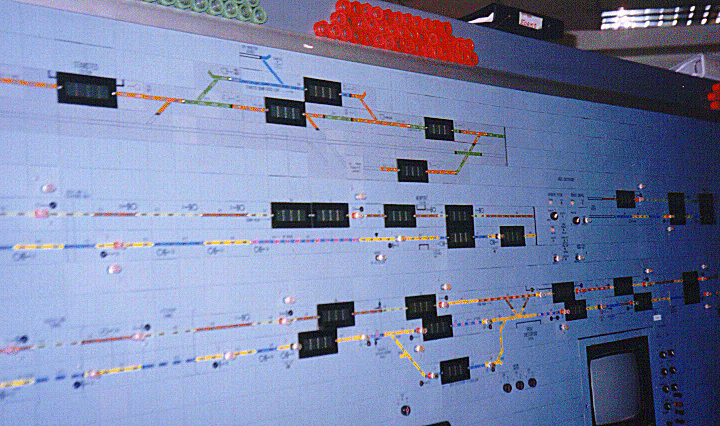
The first of four pictures of the main panel at Cambridge Power Box, a typical 1970s/1980s design using a combined control and indication panel; that is, one where the control buttons are on the same panel as the displays showing where the trains are.
All four of these photos were taken at the same time, on a Saturday morning in the late 1990s.
As can be seen, the panel is made up of small tiles, either blank or carrying minature diagrams, lamps, and buttons. When the layout is changed the tiles can easily be replaced, explaining the different colour of the top section, which was clearly added later.
The coloured lines represent tracks that incorporate track circuits (train detectors). Track circuits on the Down lines are shown alternately green and brown, while those on the Up lines are alternately yellow and blue. As can be seen at the top, this ordering is sometimes broken to ensure adjacent track circuits are a different colour, with a blue one placed between a green and a brown. Each track circuit has its number written beside it. The boundary between track circuits is sometimes marked by a white dot, indicating the end of the overlap (a safety margin after each signal). When the track circuit is occupied by a train, the section of the diagram lights up with magenta lights - though the photograph is not particularly good, these can be seen on the long blue track circuit in the middle - while when a route is set up, it lights up in white.
The small black circle-and-stalk symbols beside the track show the location of signals. The centre lights up red if the signal is at danger or green if it is not (even if the actual signal is showing single or double yellow). The versions with a ring are automatic signals which can't be controlled from the panel - the rectangle underneath the circle represents the black rectangular plate bearing a white horizontal bar that will be attached to the signal post - and the state of these signals is not shown.
Each controlled signal has a red button in the track beside it. This button is used to set up a route from the signal. The signaller presses the button, which then flashes white. He then follows along the diagram to the next signal (there may be no choice, as in the central section, or there may be alternatives, as with the loop at the bottom) and presses that button. If the route can be set up safely, the first button will switch to a steady white, the route will show as a string of white lights, and the signal will (normally) clear. Routes usually cancel themselves as a train passes, or they can be cancelled by pulling the "entry" button (the buttons are spring-loaded to a central position from where they can be either pushed or pulled). However, most of the signals on this section have a second "auto" button to the other side of the symbol. If this is pressed once the route is set up, the signal changes to an automatic mode - it will re-clear automatically, for the same route, each time a train passes until the "auto" button is pulled again.
(In some of the photos it is possible to see a small dot on each panel tile carrying a button. This is a screw to hold the tile in place; without it, the tile has a tendency to come loose when the button is pulled.)
The four signals at bottom left repay closer inspection. They are automatic signals (shown by the rectangle symbol) and the signaller does not normally have to set them, even though their state is shown by the small light in the centre. However, they have an associated button; if it is necessary to put the signal to danger in an emergency, the signaller simply pulls the button (pressing it will restore the signal to normal operation). These four signals are so equipped as they guard the two tunnels north of Audley End. A fifth can be seen in the middle of the long yellow track circuit in the central section.
Just to the left of the loop at the bottom, and also on both tracks near the right-hand end of the loop, can be seen symbols for shunting signals. These have associated control buttons that work the same way (except that there's no use for an "auto" button), but the symbol shows white for clear rather than green.
The large black rectangles are train describer berths. Though the angle is wrong to see it, each lights up with the identity of the train at, or approaching, that location. The descriptions move from berth to berth automatically as the trains progress along the track. The adjacent berths in the centre show the next two trains approaching through the long stretch of automatic signals - if there is only one, it will occupy the right hand of the two.
Train descriptions are of the form 1X23, where 1 is the class of train, X indicates the route it is taking, and 23 is just a number to make the train unique within an operating area (the number normally increases by 1 or 2 between services, but the same number may repeat at various times during the day). Describer berths can also show special codes such as POSS for an engineering possession, or ---- for an unknown train.
At the bottom can be seen four small knobs, each with three lights above it. These are "points keys", and these four work the points at each end of the loop and the associated crossovers (each crossover only needs a single control). The "keys" are three-position rotary switches. When in the central position, the points are worked via the route buttons. When the key is turned either left or right, the points move to the appropriate position if they are not locked in place by some other function. (Note: the points are drawn with a small gap on one arm. That corresponds to the "reverse" position, selected by turning the key to the right). The outer two lights show a steady white if the points are correctly locked in the appropriate position; the central one flashes white when they aren't.
The television monitor is used to oversee operation of a level crossing (technically known as an "MCB(CCTV)" crossing). When a train is due, the signaller turns on the monitor and presses a "down" button. The crossing lights start to flash and then the barriers descend. Once the crossing is down and locked, and the signaller has checked that nothing is trapped on the line, he presses a "crossing clear" button, after which he can set routes over it (the monitor turns off automatically). When all signalled trains have passed and the routes cancelled behind them, the barriers will raise automatically. The remaining controls around the monitors work things like wipers and lights (though the crossing lighting comes on automatically when it gets dark).
Finally, the set of switches and lamps above the monitor are nothing to do with it, but are for the monitoring and control of a remote interlocking (in this case, the one at Great Chesterford). Signal boxes such as Cambridge directly control only those points and signals in the immediate locality (the economic limit for the length of control cables is about 2km). Beyond that distance, the panel controls and indications are connected to unmanned interlockings at various remote locations, each of which then works nearby trackside equipment.
This part of the panel covers the area from Stansted to Whittlesford, though not all of this route is visible because of the camera angle.
At the top is Stansted Mountfitchet station and the junctions for the branch to Stansted Airport. This part appears to be "indications only"; it shows which trains are runnng and where, but does not provide control of the signals or points. Note that the Up line is shown in outline only, indicating a track not subject to this signal box.
The central section passes through Newport (Essex) station; the platforms can be seen, in outline, near the right hand end.
The bottom section runs from just north of Audley End station to a point near Whittlesford (it actually extends along the panel all the way to Cambridge and beyond). The loop is the Up Goods loop south of Great Chesterford and the monitor works the level crossing just north of that station.
Finally, the section of track to the right of the remote interlocking controls is the line from Cambridge to Royston; Cambridge box takes control a little north of the latter.
Previous photograph Next photograph (also Cambridge)
 Back to the
photographs index.
Back to the Rail index.
Back to the
photographs index.
Back to the Rail index.
 Back to
Clive's home page.
Back to
Clive's home page.