


Dedicated to the memory of Danny Goodrum, died February 2006, who provided me with invaluable help in developing this simulation.
This was my first major SimSig simulation (Royston having been a relatively simple one). As my home territory it was an obvious one to start with. The second release extends the territory north-west to connect to Peterborough, and adds some minor features, but is otherwise very similar to the first.
Despite the apparent simplicity of the layout, it's actually a far busier simulation than it appears. Cambridge is split on to six screens and includes the entire area of the real Cambridge Power Signal Box, plus the Royston area of King's Cross and a simplified view of the lines from Manea to Peterborough.
Cambridge is the first simulation to have a large number of AHB, MWL, and telephone crossings. It is also the first to feature "one-touch" routes, where pressing the entrance button is sufficient to set the route; there is no corresponding exit button. Obviously these only appear where there is only one route from a signal.
SimSig is for personal entertainment use only and must not be used for any commercial use, including the training of signallers etc. Those who are interesting in the commercial application of this software should look at www.theraileng.co.uk.
SimSig is protected by copyright. No SimSig file may be distribution by any other website, by CD ROM or other media without express written permission from G. Mayo. The only exception is when SimSig files are transferred between private individuals where no charge, fee or profit levied.
This software and is offered as-is, "what-you-see-is-what-you-get". Errors, omissions, faults or other problems are not covered by any warranty of any kind. Problem reports may be emailed or posted on the forums but action may or may not be taken by the authors, a decision which is up to said authors. SimSig accept no responsibility for any damage that may be caused to computer systems by the software.
My thanks to Geoff and Mike for teaching me how to write simulations, to Pascal Nadin for diagrams of the Ely resignalling, to Peter, Kurt, and Daan for vast amounts of testing over the years, to everyone who found bugs in earlier versions, to the beta testers who hammered the later versions, and finally to my family for putting up with me, even if they didn't understand what I was doing or why.
SimSig Cambridge attempts to match the real experience as far as possible. Signal, points, and track circuit numbering are all taken from photographs of the real panel and therefore are accurate, as are matters such as overlap locations and available routes. Speed limits are taken from the Sectional Appendix. In particular, the availability or otherwise of "auto" buttons on signals directly matches the prototype.
One significant deviation from reality is the provision of train describer berths at every signal including shunt signals. In addition, screen 6 is a simplified view and, as described below, many features of the real layout are omitted.
In general the simulation replicates the situation as of 2005. Any discrepancies from this are listed in this manual.

The area covered by SimSig Cambridge follows the majority of the Great Eastern Railway main line from London Liverpool Street, starting near Stansted and running via Cambridge to Ely and thence towards Peterborough (where it connects to SimSig Peterborough), King's Lynn, and Norwich (though the control area ends at Littleport and Shippea Hill respectively on the latter two). It also includes three branch routes: the Cambridge to London King's Cross line as far as Baldock (where it connects to SimSig King's Cross), the Newmarket branch as far as the passing loop at Dullingham, and the western part of the line from Ely to Ipswich.
The simulation covers the main route on views 1 to 4, while view 5 covers the assorted branches and view 6 is the lines from Manea through March to Peterborough. On all views the Up direction is leftwards and the Down direction rightwards.
A quick guided tour follows. It is advisable to open SimSig Cambridge and follow this tour.
View 1: This consists of four stripes making up the 20-odd miles from Stansted North Junction at top left to Shelford at bottom right. Apart from the reversible platform at Audley End, the loops at Great Chesterford and Whittlesford, and the sidings at the latter and Duxford, the layout is plain track and, you would have thought, be easy to operate. However, this section also has 13 separate level crossings, 5 of which have to be operated for each train, and it is easy for a beginner to find themselves dealing with calls from delayed trains. This screen provides duplicate controls for Shepreth Branch Junction so that regulation of the junction can be carried out by either screen 1 or 2.
View 2: The main part of this screen shows Cambridge station itself – with the famous long platform and central scissors crossover – and the associated sidings and yards. In order to fit the layout on sensibly, the adjacent junctions (Shepreth Branch Junction for the line to Baldock and Coldham Lane Junction for the Newmarket branch) had had to be "folded" into the corners.
View 3: Another screen divided into "stripes". At the top are Chesterton Junction sidings and the connection to the Fen Drayton branch, actually a glorified long siding. In the centre is the long run through the fens from Cambridge to Ely. Finally, the bottom section covers Ely station itself, with the connection to the Ipswich line sneaking in from the bottom left. While most of the activity will be at Ely, the level crossing at Chesterton Junction should not be forgotten.
View 4: The last section of the main line and the complex of junctions north of Ely. Here the line branches into three: towards Manea and thence Peterborough and the ECML, towards Littleport and King's Lynn, and towards Shippea Hill, Thetford, and Norwich. The Ely West Curve allows trains to run between the first and the other two while avoiding Ely itself (though few trains do so) and there's also the connection into Papworth's sidings. Note the potential for conflicts at the single lead junctions, and be prepared to find that the signalling hinders rather than helps.
View 5: This screen covers the three main branches. At the top we have Chippenham Junction to Ely via Soham, partly double track and partly single and with two private sidings at Snailwell. In the middle is the Newmarket branch as far as Dullingham, with nearly 10 miles of single line and 8 more level crossings (7 on this screen, 2 of which are controlled). Finally, the two bottom sections are the "branch" - but in fact just as important - line to Royston, Baldock, and King's Cross, with the Barrington Light Railway and the gate box at Foxton, plus the busy layout at Royston.
View 6: The final screen is a simplified view of the line from Manea to Peterborough, plus the yards at March and Wisbech. This screen can be left to operate itself most of the time.
It is beyond the scope of this document to list all the speed limits in the simulation, but they are mostly in the 60 to 90mph range with frequent changes. Several sections have differential limits for passenger and freight trains. Cambridge and Ely station areas are mostly 40mph, while crossovers are mostly 15mph or 20mph.
The standard 25kV overhead equipment powers much of the area and many of the trains will be using this. Both routes from London are electrified as far as Ely and then towards Littleport. In general, running lines are wired but sidings are not; details are given in the specific locations. The lines to Peterborough, Shippea Hill, Dullingham, and Chippenham Junction are not electrified.
The lines from about milepost 65 northwards are controlled by the four SSI cubicles at Ely. Equipment failures in this part of the simulation will be reported in relation to the relevant SSI cubicle rather than the exact physical location:
| Cubicle | Reported as | Description |
|---|---|---|
| EYC | Ely | Ely station area and main line southwards |
| EYE | Queen Adelaide | Lines to Littleport and Shippea Hill |
| EYN | Ely North Junction | Kiln Lane AHB to Manea |
| EYS | Soham | Soham and Chippenham Junction branch |
When lengths are given, they are for the entire section between signals or track circuit boundaries and do not allow for the fact that trains will normally come to stand several metres before the signal or another train.
This is one of the two main entry points from the south. The three Stansted junctions form a triangle joining the airport branch to the main line, but this factor can be ignored for simulation purposes.
Elsenham is the first controlled level crossing in the simulation. Unlike most of the others, it is worked by a local gate keeper. This means that the Cambridge signaller can simply set routes across it well ahead of time (or use the Auto buttons) and not have to worry about delaying road traffic; when the keeper has closed the crossing the signals will clear. This arrangement is replicated in the simulation. The simulated gate box will close the crossing in any of the following circumstances:
Down trains can use the up platform, though this does not happen in the provided timetable. The Down platform is 420m long while the Up platform is 280m with an extra 100m between the facing crossover and signal 44.
The lack of Auto buttons means this station can't be ignored.
The Up Goods Loop is 520 metres long and is fully wired. Note that there are no signalled moves over the facing crossover; it can only be used by instructing a driver to pass a signal at red. Ickleton Road crossing at the north end has a parallel underpass for road traffic, so it is normally only used by the few vehicles which can't fit through the underpass but do fit under the catenary. This means it can be closed reasonably early for trains without disrupting road traffic.
The shunting neck is only a few metres long. Despite this, there is a separate indication on the signal and a separate button on the real panel to set a route from 527 shunt signal in to the neck. Because it is so short, there is no corresponding exit signal - anything sent in there will have to be told to reverse direction to get it out again.
The Down Goods Loop and the crossovers are wired but not the sidings or spur. Again, there are no signalled moves over the facing crossover; it can only be used by instructing a driver to pass a signal at red. The Down Goods Loop is 530m long; the spur is 80m.
When a 4-car train is stood at Shelford station the driver cannot see signal 99 protecting Granhams crossing. The latter is provided with manual controls so that it can be lowered early to improve the regulation at Shepreth Branch Junction.
This is the junction for the two routes to London and appears on both screens 1 and 2 to allow either to regulate it as necessary. On each screen there are additional train describer berths to show approaching traffic; these have no equivalent on the real panel but simply avoid the need to keep flipping between views. A description will appear on screen 2 when the corresponding description reaches signal 93 (which will be once the train passes signal 91 and approaches Sawston crossing), and on screen 1 when it reaches signal 148 (i.e. the train has departed Cambridge station) or 115 (meaning it is approaching Foxton).
The Cambridge station area is by far the most complex section of the simulation.
The Charringtons and Coalfields sidings were abolished a few years ago but I had the full signalling details and decided to include them in the simulation. The remainder of the layout is as shown on the real panel.
The following lines are electrified:
There are a number of alternative routes at the south end of the station (for example, there are three routes from platform 1 to the limit of shunt on the Down Main); the appropriate one will be selected automatically depending on the state of the various sets of points.
Technical limitations with the simulation mean that the main platforms require careful use.
Platform working at Cambridge is an art as much as a science. It probably won't matter if you put a train into 4 instead of 1, but sometimes you'll find a conflict at the scissors if you do so. Similarly, there is a certain amount of "double docking" in the bays and it is important not to get this wrong. The worst disaster, of course, is to put a through train into one of the bays. At times platform space can be tight and it can be a mistake to bring a train past signals 147 or 149 too early.
When setting a route up to the scissors crossover, using the signal as the exit point will set an unrestricted route with the overlap shown on the diagram. To request a Warning route, use the yellow triangles as the exit point; the overlap will then extend over the scissors crossover only. The overlap will swing automatically as needed (unlike on the real panel). There is also an automatic warning route from the scissors crossover to signal 175 at the north end of platform 4; this will be used if a route is set in or out of platform 5 or 6 (but, of course, if you set the route up to 175 first it then won't be possible to send a train into the two bays until the overlap has timed out).
The two triangles either side of "Goods Lines" can be used to call a loco on to the front of a stationary train. The left hand triangle is used as an exit from shunt signal 659 and the right hand one from shunt signal 710. The route can only be set if the corresponding goods line is occupied. Loco joins should also work in the platforms, but there may be technical problems with doing them on the Through Line.
Shunting moves reversing at signal 659 can be signalled out to any destination (shunt spur, main lines, or Charringtons), but the train describer will only operate correctly if the move is signalled into the shunt spur.
Several sets of points in the station area have "time of operation locking". This means that the points cannot be moved - even to swing an overlap - when a train is occupying the adjacent track circuit. The lock times out after approximately 30 seconds.
The platforms, the Through Line, and the Goods Line count as "Cambridge" for timetabling. Remember that the "stops on through line" flag will be needed if a train is timetabled to stop on the Through or Goods Lines, particularly for a loco join. The Reception lines are "Cambridge TC (reception)".
Carriage Sidings 1 and 2 (or, in a pinch, the Arrival line) should be used to store trains that will be going back into service. Trains signalled into sidings 3 to 8 will leave the simulation. Normally trains heading into Cambridge station will appear in sidings 3 to 5 and those heading to Ely in sidings 6 to 8, but it is possible that a train will come from the "wrong" place and need to reverse. Note that a release must be requested from the shunter to send a train into sidings 3 to 5.
For technical reasons, trains from Coldham Lane Depot should not be given a passing time at the Carriage Sidings, though a stopping time is all right.
The lengths of the platforms and certain sidings are as follows:
| Platform 1 and Through Line | 252m | (two track circuits of 126m) | |
| Platform 2 | 217m | (track circuits of 107m and 110m) | |
| Platform 3 | 177m | ||
| Platform 4 and Through Line | 230m | (two track circuits of 115m) | |
| Platform 5 | 172m | (two track circuits of 86m) | |
| Platform 6 | 150m | (two track circuits of 75m) | |
| Up Spur | 90m | ||
| Down Goods Line | 590m | ||
| Up Goods Line | 550m | ||
| Reception Line 1 | 520m | ||
| Reception Line 2 | 510m | ||
| Reception Line 3 | 440m | ||
| Carriage sidings arrival line | 300m | ||
| Carriage siding 1 | 300m | ||
| Carriage siding 2 | 320m | ||
| Carriage sidings headshunt | 261m | ||
| Breakdown siding | 151m | ||
| Engine siding | 100m |
Some uncommon moves (e.g. reversing at signal 655) may cause the train description to end up in the wrong place. Think of it as increasing the realism!
The main line continues on to screen 3, while the Dullingham and Newmarket single-line branch is on screen 5.
The "approaching" berth has no equivalent on the real panel but is provided to allow easier management of the junction without continually flipping between views. A description will appear in it when the corresponding description reaches signal 228 (which will be once the train passes signal 230 and approaches Milton Fen crossing), but only (where relevant) if signals 228 or 212 are clear for the main line.
Once upon a time there was a line from here to Soham. The line and junction disappeared decades ago, and all that is left is the Shell-Mex siding (180m long) on the branch alignment. In reality this is controlled from a ground frame with a release on the panel, but it has been shown here as if it were fully signalled.
Descriptions at signal 210 (other than those inserted manually) will be repeated automatically at signal SMX1.
Trains leaving the Fen Drayton branch, and those standing at shunt signal 752 on the Down Line, can only be signalled to the Up Line (signal 212) even if they are then proceeding into one of the sidings or towards Ely. Only trains leaving the sidings can be signalled to the Limit of Shunt opposite Barnwell. The spur at the Ely end is 100m long.
The Fen Drayton branch is now officially closed and the track has been removed as part of conversion to a misguided bus route, but it remained legally open for many years after the last train ran (when trains did run, the several level crossings along it were all Trainman Operated). The signalling to allow trains on and off the branch is still shown on Cambridge panel and is replicated here. The branch itself is operated under One Train regulations; when a train is waiting to leave the far end it will request permission - this is granted by clicking on the flashing white light. Permission can be withheld to allow you to send a train down the line first. The symbols looking like red signals with a grey background are the marker boards for OT working and do nothing. The identity of the train on the branch is shown on the simulation (but not on the real panel).
"Stop/Non-Stop" controls are in place on the Down Line at Bottisham Road AHB (nothing special applies to Up trains). The crossing "strike-in" controls are south of Waterbeach and so, if a train stopped at the station with signal 235 off, it would take so long to reach the crossing that there would be a serious risk of road users thinking the crossing had failed. Therefore the signal only clears when the berth track circuit has been occupied for about 30 seconds or the non-stop button has been pressed. This must be done separately for each train.
The three platform lines and the Reception sidings are electrified; the Up Goods Loop and its links to the Up Line are not. Normally platform 3 is used for trains reversing south-to-north (e.g. services between Peterborough and Norwich). The level crossing can be left to operate automatically most of the time, but it can sometimes be useful to control it manually (for example, if a train from the Down Line to platform 2 is to be immediately followed by a Down train from platform 1). However, this crossing requires the signaller to specifically confirm that it is clear each time it is lowered.
Both lines from here to Ely North Junction are fully reversible. Trains heading to Manea and Peterborough must depart on the Down Line; those to Littleport, Shippea Hill, and Papworth Sidings can use either line.
When a train enters the Up Goods Loop from the north to signal 270, the track segment covering the points to the Engineers Siding will stay white. This is to lock the points so that a train may reverse safely and is not an error.
The Reception sidings and the Up Goods Loop are separate locations for timetabling purposes. However, trains routed via (but not stopping at) either Ely station or the Up Goods Loop can be sent either way.
The lengths of the platforms and certain sidings are as follows:
| Between signals 253 and LOS | 503m | ||
| Between signals 255 and 760 | 634m | ||
| Between signals 256 and 257 | 533m | ||
| Reception Lines | 464m | ||
| Platform 1 | 265m | (track circuits of 132m and 133m) | |
| Platforms 2 and 3 | 288m | (two track circuits of 144m) | |
| Up Goods Loop | 605m | (between signals 270 and 287) | |
| Up Goods Loop | 782m | (between signals 262 and 287) | |
| Engineers Siding | 430m | (between signals 272 and 769) | |
| Engineers Siding | 482m | (between signals 272 and 287) |
You will quickly discover that this junction is very awkward to use. Nearly all moves need to run over the one bidirectional section of track, resulting in endless conflicts.
Double-blocking is in use at the junction. This means that signals 295, 306, 800, and 908 will stay red until the next signal has cleared (or, for trains going into Papworth sidings or clockwise around the West Curve, until the route is set and a train has occupied the berth track circuit for a sufficient time).
The lines between Ely and Littleport (and thus only one track through the junction) are electrified, but no others.
When reversing a train to go into Papworth Sidings from the north, there is room for a 320m goods train to stand between signals 298 and 303 or between signals 296 and 305; longer trains must be signalled across Kiln Lane crossing to bring their rear inside the latter, or must be signalled directly in from signal 771.
The spur behind signal 773 is 430 metres long.
If you are reversing a down train at signals 776 or 778 to go back towards Ely, the main signal (307 or 801) should be replaced to red to stop the AHB operating spuriously.
Signals 780, 914, and 910 on the Down Line, and 301 on the West Curve, were locked out of use on the real panel when first installed, being brought into use six years later (in 1994). At some later date they were taken out of use again and are locked out at present. This means that the crossover cannot be used and the West Curve can only be used for moves towards March. When starting a game you can choose whether this remains the case or whether the West Curve should be bidirectional.
Ely West Junction only needs to appear in timetables for trains using the Ely West Curve or reversing at signal 780.
These are two of the three main entry points from the north, from King's Lynn and Norwich respectively. The line to King's Lynn in fact becomes single just north of Littleport, but this will not affect operation of the simulation.
This is the entry point for trains from Ipswich and Bury St.Edmunds towards Ely. The line shown heading up and to the right is in fact the Dullingham and Newmarket branch to Cambridge, but trains running that way will not appear on this part of the simulation. However, a train from Ely and one from Dullingham could conflict, requiring the signaller at Chippenham Junction to make a regulation decision. If the Dullingham train is given precedence, signal CM4 will be held at red until it has cleared the junction; otherwise it will clear for trains as they approach.
There are two separate sets of sidings at Snailwell: Firmin Coates and King's. In reality these are, once again, controlled by a ground frame with a simple release on the panel (not distinguishing between the two). However, as at Barnwell, they are shown as if fully signalled.
This is where the double line becomes single for the last section to Ely. The triangle to the right of Middlemere AHB is the exit point for the route from signal 495 towards Ely.
Particular care should be taken when setting routes for trains in opposite directions. If the route from 495 is set with an Up train still between Middlemere and Mill Drove crossings, the former will operate falsely (this will happen in real life as well).
The two level crossings at Cherry Hinton both involve busy roads and therefore they should not be closed too early.
The sidings and ground frame just east of Fulbourn AHB were closed and removed in 2004. I have omitted them from the simulation.
Dullingham station is the fringe box for this line - it consists of a passing loop before the line reverts to single track for the run via Newmarket to Chippenham Junction. In reality the loop points and the three signals D1 to D3 are operated by Dullingham signal box, with Cambridge panel having a slot on D2. For simplicity this is not replicated in the simulation. Instead D2 is treated like a normal signal, while the route will be set automatically from D3 into the loop whenever a train is signalled up to it. D3 will also approach-release if the points are hand-keyed to the reverse position so as to mitigate the effects of a track circuit failure behind an Up train.
The effects of the single line on D3 are simulated as far as possible: D3 cannot show green for a train until the preceding train has had time to reach and pass Chippenham Junction, and will show red if a Down train is being held in the station.
Unlike the other two lines on screen 5, Baldock is the other main entry point from the south and the line carries a frequent and fast service.
The Cambridge simulation may be chained to the King's Cross one at this point.
The section of the simulation from Baldock to just north of Royston is actually part of King's Cross PSB, not Cambridge, and the signals all have a K prefix.
The layout here reflects that of around 1980; most of the sidings have since been lifted, though sometimes small stubs remain. The two running lines and the crossovers between them are electrified, but not the sidings. It is common for trains to join or split at Royston, and the signalling is set up to allow this. It is also practical for a train to run "wrong line" through the station in either direction, and the supplied timetable contains examples of this. Also keep an eye open for the occasional Royston reverser, usually running with an R headcode.
In order to provide a more accurate simulation of Cambridge, the Royston area can be put into automatic mode using the button above platform 2. When this is turned on, the routes straight through the station will be set automatically as trains pass. Automatic mode can be turned off by right-clicking on the button or by cancelling any of the 6 routes.
Trains signalled into Sherriff's siding, or into the Down Loop from the Baldock end, will leave the simulation if they have no further timetabled activities, but will remain if they do. The maximum length of such a train at Sherriff's is 200 metres.
The Down Loop is 193 metres long and the Up Siding 60 metres.
"Stop/Non-Stop" controls are in place on the Up Line at Shepreth AHB. See Waterbeach for a full description.
If you are reversing a train from the Up Line to go back to Foxton, signal 110 should be replaced to red to stop the AHB operating spuriously.
As with Elsenham, Foxton level crossing is managed by a separate gate box. This again means that the Cambridge signaller can simply set routes across it well ahead of time (or use the Auto buttons) and not have to worry about delaying road traffic; when the keeper has closed the crossing the signals will clear. This arrangement is replicated in the simulation. The simulated gate box will close the crossing in any of the following circumstances:
The spur is 50 metres long.
As a point of interest, the line to the cement works is actually an independent railway - the Barrington Light Railway - and not part of Network Rail.
The line from Manea to east of Peterborough East is controlled by a number of mechanical signal boxes and still has a number of semaphore signals. No attempt has been made to reproduce the full details of the track layouts (such as crossovers and emergency sidings) at these boxes, but all the main line signals are shown and are in the correct locations. The track circuits shown are nominal ones and do not necessarily correspond to those in reality.
The layout at March is that before the major works around 2005 and the closing of Wisbech yard. Not all tracks and moves are simulated. For example, it is not possible in the simulation for a train to run from the Up Reception Sidings towards Peterborough, even though this can happen in real life.
Trains entering the Reception sidings should be sent on to the Goods lines (use exit signals ME9 and MS4) if they are continuing on and in to the sidings themselves (use exit signals MECD and MS2) if they are terminating.
There is 380 metres between signals ME30 and ME52, and 180 metres between signals ME26 and ME49.
When a train is waiting to leave any of the three yards the shunter will request permission to dispatch it through the yard throat - this is granted by clicking on the flashing white light. Permission can be withheld to allow you to send a train into the yard first. Granting permission does not clear the yard exit signal.
The button labelled "AUTO FCFS" activates a simplified "first-come-first-served" arrangement. As a train approaches certain signals, its timetable will be examined and the simulation will attempt to set the route for it. Note that this does not work in the same way as Automatic Route Setting in other simulations; in particular, if a route can't be set at the right moment because of a conflict, it might not be set later. Trains waiting on the Goods lines will never be given a route automatically in case they are being held for another train to pass.
The button labelled "MAIN LINE" causes the main line routes to remain set continuously, as if all those signals had Auto buttons.
The long sections of line with closely-spaced signals have a "first two" train describer arrangement: the describer berth used does not correspond to the specific location of the train, and if there are more than two trains in the section then only the first two are displayed (but the remainder will be remembered and will appear when there is room).
This is the third entry point from the north.
The Cambridge simulation may be chained to the Peterborough one at this point.
Most of the scenarios are self-evident. This section contains notes on any special situations.
This scenario involves a blockage on the Up Line from Ely West Junction to the north end of Ely station. Since bidirectional signalling is available, trains can run normally but will need to be scheduled carefully. Note that Kiln Lane and Q.A.(Peterborough) AHB crossings will lower and then fail; it can be assumed that they have been taken under local control for the duration of the scenario.
Ely West Curve will always be bidirectional in this scenario, irrespective of the choice made when setting it up.
This scenario assumes a major but localised problem at Sawston, blocking the Down Line. Therefore Single Line Working with Pilotman needs to be operated on the Up Line between Whittlesford and Shepreth Branch Junction. Because of the layout at the latter, it is simpler to extend the SLW to Cambridge than to have to shunt trains back to the Up Line. In these circumstances, the Sectional Appendix allows for separate SLW on the Down Line, with a second Pilotman, for trains to and from Royston.
Handsignallers are stationed at each of the six signals governing entry to the single-line sections:
Trains will obey all relevant signals and must be signalled in the normal way as far as possible. The handsignallers at CA123 and CA148 have local override keys for those signals and will only clear them under the authority of the Pilotman. Trains running in the wrong direction will be flagged past CA83 and the three limits of shunt by the handsignallers - again under the authority of the Pilotman - and will not need to be specifically authorised. You must ensure all points are set for the safety of these trains, by hand-keying them as necessary (note that three of the four sets of points at Shepreth Branch Junction are clamped and padlocked). You do not need to lower the barriers at the three controlled level crossings for trains running in the wrong direction; the crossings will be under local control of more handsignallers.
If you lose track of a Pilotman, you can phone his assistant to find out where he is or to request that he call back when next available. If you tell him that a train doesn't need piloting and then change your mind, get him to phone you and one option will be to send him back to that train.
Any of the 7 fringe signal boxes can be told that the line is blocked by putting a special code into the relevant train describer berth:
While in most cases the code is entered into the "approaching" or first berth, for technical reasons there are two exceptions: for Peterborough East the code should be entered into the berth for signal W4 at Whittlesea station, and for Baldock it should be entered into the berth for signal K971 just to the right of Ashwell & Morden station.
The supplied timetable is based on the workings of July 2003 with some special workings from May 2008 merged in. It runs from 02:30 to 02:30 the following day (shown as 26:30), though the last timetabled move ends at 26:04.
There are a total of 510 schedules in the timetable involving 347 trains entering the simulation, 8 loco run-rounds, 9 other divides (one of them a 4-way divide), and 14 other joins. The entry points are:
| Baldock | 78 |
| Peterborough East | 65 |
| Stansted North Junction | 61 |
| Shippea Hill | 39 |
| Littleport | 24 |
| Chippenham Junction | 24 |
| Cambridge Carriage sidings | 21 |
| Dullingham | 11 |
| March Down Reception Sidings | 9 |
| March Up Reception Sidings | 6 |
| Papworth sidings, Ely | 4 |
| Coldham Lane Depot | 2 |
| Snailwell Sidings | 2 |
| Cambridge Loco Sidings | 1 |
Standard railway descriptions (headcodes) are used in SimSig, as always. The first digit is the class of train. The second character is a letter, which usually denotes the route taken by the train. The remaining two digits simply give each train its own identity.
The train classes are:
| 1 | Express Passenger Train |
| 2 | Local Passenger Train |
| 3 | Priority Empty Coaching Stock (in this timetable) |
| 4 | Freight Train (75mph) |
| 5 | Ordinary Empty Coaching Stock |
| 6 | Freight Train (60mph) |
| 7 | Freight Train (40mph to 45mph) (not in this timetable) |
| 8 | Freight Train (35mph or less) |
| 9 | International Services (not in this timetable) |
| 0 | Light Locomotive |
The speed of classes 1,2,3 and 5 are determined by the train type. 75mph, 90mph, and 100mph stock is found in the timetable.
The route letters found in the timetable are as follows. They are only a guide; always check the actual destination of the train. Furthermore, light engines and empty coaching stock normally use the same last three characters as the related service train, even if they don't follow the route implied by the letter.
| A | Trains from Cambridge to Harwich (via Dullingham) |
| B | Not used |
| C | Trains between King's Cross and Cambridge |
| D | Trains to Leeds/Bradford/York |
| E | Trains to Eastern Region via Peterborough, and ECS to Hornsey |
| F | Not used |
| G | Not used |
| H | Trains between Liverpool Street and Cambridge or King's Lynn |
| I | Not used |
| J | Not used |
| K | Not used |
| L | Trains via Peterborough to Norwich, Ipswich, or Stansted Airport |
| M | Trains to London Midland Region (mostly via Peterborough) |
| N | Trains to London Midland Region via Peterborough and Stamford |
| O | Trains to Southern Region |
| P | Trains from Cambridge or March to Norwich |
| Q | Conditional services running occasionally |
| R | Trains between King's Cross and Royston |
| S | Trains to Scottish Region |
| T | Trains between King's Cross and King's Lynn (or Ely) |
| U | Not used |
| V | Not used |
| W | Trains between Cambridge and Ipswich via Dullingham |
| X | Out-of-gauge trains |
| Y | Not used |
| Z | Special trains |
First Capital Connect (WAGN until 31st March 2006) run 100mph EMUs between King's Cross and King's Lynn. The fast service is the "Cambridge Cruiser" - non-stop (except in the peaks) between London and Cambridge every 30 minutes, with alternate trains running to King's Lynn. Fitting between these is a stopping service between London and Cambridge, plus a few Royston reversers in the morning peak.
National Express East Anglia run 100mph EMUs between Liverpool Street and Cambridge, extending to King's Lynn in the peaks.
A variety of diesel services run through Ely. Most of these run via March and include services between Norwich and the Midlands (reversing at Ely), trains between Stansted Airport, Cambridge, or Ipswich and Peterborough, and a service between Cambridge and Norwich. Keeping these untangled at Ely North Junction can be interesting.
Finally there is an irregular service between Cambridge and Ipswich via Dullingham. Outside the immediate Cambridge area these require no attention.
There are a number of fast (class 4) freights between the Ipswich area and the Midlands, running via Chippenham Junction, Ely, and March.
Slower (class 6) freights run on a number of routes:
Some freight services run to and from March Reception Sidings, but there are no services using March TMD, Whitemoor, or Wisbech in the timetable.
There are a few special workings that will appear occasionally.
|
|
This section lists the internal codes (which in many cases are TIPLOC codes) for the timetable locations in the simulation, and also provides a brief description of the less-obvious locations. These codes are used when using the timetable converter.
When a train enters the simulation a different code - an entry point code - is used. These codes are shown in italics following a » symbol. In general, the entry location should not be the first location in the train's timetable as well.
| STANNJN | Stansted North Junction » ESTAN. | |
| ELSENHM | Elsenham. | |
| NEWPRTE | Newport. | |
| AUDLEYE | Audley End. | |
| GTCHSFL | Gt. Chesterford UGL; Up Goods Loop signals 64 and 521. | |
| GTCHSFD | Gt. Chesterford; station, including behind signal 524. | |
| CAMB515 | Gt. Chesterford CA515; south of Fairheads MWL crossing. | |
| CAMB519 | Gt. Chesterford CA519; use for reversing on the Up Main. | |
| CAMB528 | Duxford (reverse, CA528); use for reversing into CIBA-Geigy. | |
| DUXFORD | CIBA-Geigy Duxford » ECIBA. | |
| WTLESFD | Whittlesford; station. | |
| CAMB531 | Whittlesford (reverse, CA531); use for reversing on the Up Main between the station and the sidings. | |
| WTLEDGL | Whittlesford DGL; Down Goods Loop. | |
| WTLEFDR | Whittlesford sidings; behind signal 533 » EWHITS. | |
| CAMB536 | Whittlesford shunt spur (the old code CAMB534 may be used to represent this location as well, but the simulator will only generate CAMB536). | |
| CAMB540 | Whittlesford N (reverse); behind signals 540 and 84, use for reversing on either line. | |
| SHELFD | Shelford. | |
| SHPRTBJ | Shepreth Branch Junction. | |
| CAMB147 | Camb. S (CA147 DSL); Down Slow. | Use CAMB147 and CAMB149 both for trains waiting to enter Cambridge and those reversing. All three of these locations are equivalent in practice so that trains can be diverted on the fly. |
| CAMB149 | Camb. S (CA149 DM); Down Main. | |
| CAMB647 | Camb. S (CA647 UM); Up Main. | |
| CAMB645 | Charringtons » ECHAR. | |
| CAMBCGF | Cambridge Coalfields » ECOAL. | |
| CAMB657 | Cambridge shunt spur; south of the station. | |
| CAMBDSJ | Cambridge South Junction; signals 646, 653, and 655 approached from either direction, or the corresponding location on the Up Main (this latter is only included for importing timetables that use this TIPLOC as a timing point). Do not use for trains moving to the Reception Lines, or for reversing trains on the Up line; use CAMB647 instead. | |
| CAMB659 | Cambridge TC (CA659); signal 659; use for light engines shunting between tracks or to hold a light engine coming from the south. Can only depart into the reception lines or on to the Up Goods. | |
| CAMBDGE | Cambridge; station, Through Line, and Goods Lines. A train will only "arrive" on the Through Line once it has passed the central crossover. Trains can be timetabled to move between platforms 1 and 4 and the Through Line (thus having this location twice in succession), but at least one end of the move must have the platform code (1, 4, TLS, or TLN) specified. | |
| CAMBGTC | Cambridge TC (reception); the five reception lines east of the Goods Lines » EREC4D or EREC4U (to depart northwards or southwards respectively). | |
| CAMBDHS | Cambridge loco sidings » ELOCO. | |
| CAMB706 | Cambridge engine spur. | |
| CAMB180 | Camb. N (CA180 UM); between signals 180 and 733 on the Up Line, including approaching 180, but not 733, from the Carriage Sidings. | |
| CAMB708 | Camb. N (CA708 DL); can only be approached from the north, and not be used for reversing trains. | |
| CAMB721 | Camb. N (CA721 CS); between signals 710 and
721. Trains approaching from the north to reverse must not be routed
towards sidings 6 to 8. Trains from the south to reverse can only come
past signal 710, not past signal 180. Note that this point used to be called CAMBDNJ. | |
| CAMBDCS | Cambridge carriage sidings; includes the headshunt, the Arrival Line, and sidings 1 to 8. Note that a train can be timetabled to move between sidings 6 to 8 and the remainder. » EESSO (3-5), ECS6 (6), or ECS7 (7-8). | |
| ZCCS678 | Cambridge CS 6-8; carriage sidings 6 and 7/8 only. This location is an alternative to CAMBDCS, but should only be used where necessary (for example, to ensure that a train from Coldham Lane TMD to siding 6 does not stop on reaching signal 724. » ECS6 (6), or ECS7 (7-8). | |
| CAMBTMD | Coldham Lane TMD » ECLDA, ECLDB, or ECLDD (the last letter indicates the specific track where the train will appear). | |
| CAMB734 | Cambridge breakdown siding. | |
| CAMBDNJ | Cambridge North Junction; signals 190, 193, 195, and 732; use for holding trains or reversing them on the Down Goods Loop. | CLDHMLJ | Coldham Lane Junction; use for all through movements. |
| BRNWJRP | Barnwell Jn. (reverse); use for reversing south to north at signals 211 and SMX1. | |
| BRNWJBP | Barnwell Jn. Shell-Mex siding; use for both the siding and for the Up Line between the siding points and the Limit Of Shunt (only for trains to and from the Coldham Lane Junction direction). | |
| CESTRTJ | Chesterton Junction; on the Down Line, represents the crossover points but only for trains coming from signal 211; on the Up Line, between signals 212 and 751. | |
| CAMB752 | Chesterton Jn (CA752); use for reversing on the Down Main. | |
| CESTRTB | Chesterton Jn (Ballast) » ECHSJU2. | |
| CESTRTR | Chesterton Jn (Redland) » ECHSJU1. | |
| CESTFHH | Chesterton Jn (FHH) » ECHSJD. | |
| CAMB758 | Chesterton Jn (spur). | |
| FNDRYTN | Fen Drayton; far end of the branch; note that trains from Fen Drayton must be timed at Chesterton Junction » EFEND. | |
| WATBECH | Waterbeach. | |
| CAMB253 | Ely S CA253 (reverse); use for reversing at signal 253. | |
| ELYYRCS | Ely Reception south; signals 254, 255, 256, 257, 760, and 761. | |
| ELYYREC | Ely Reception; signals 273, 762, 764, and 765. | |
| ELYYDLN | Ely Dock Junction;
| |
| ELYYUGL | Ely Up Goods Loop; signals 270, 272, 287, and 769 (and so including the Engineer's Siding). Trains not timetabled to stop can also be sent via the platforms. | |
| CAMB766 | Ely Cripple Siding » EECRIP. | |
| ELYY | Ely; station (the three through platforms). Trains not timetabled to stop can also be sent via the Up Goods Loop or Engineer's Siding. | |
| CAMB288 | Ely north (reverse); use for reversing at signals 288 and 290. | |
| ELYYNJN | Ely North Junction; signals 296, 298, 303, and 305; for moves to and from the Ely West Curve, the diamond crossing with the Down March. The Line codes GL, ML, and SL all refer to Papworth sidings. | |
| CAMB771 | Ely N CA771 (reverse); use for reversing at signal 771. | |
| ELYYPHS | Ely Papworth headshunt. | |
| ELYYPAP | Ely Papworth Sidings; the codes ELYYFHH and ELYYPAW may be used to represent this location as well, but the simulator will only generate ELYYPAP » EPAPW. | |
| CAMB771 | Ely N CA771 (reverse); use for reversing at signal 771. | |
| CAMB776 | Ely North Jn (reverse); use for reversing at signals 776 and 778. | |
| LTLPORT | Littleport » ELPT. | |
| SPHL | Shippea Hill » ESHIP. | |
| ELYYWJN | Ely West Junction; signals 780 and 917 on the Down March (use for reversing at signal 780), and the facing points on the Up March. | |
| CHTISHM | Chettisham; the track circuits at the AHB. | |
| MANEA | Manea (» EMANEA remains valid for compatibility with old timetables, but should not be used in new ones). | |
| MRCHSTH | March South; signals MS27 and MS35. | |
| MARCHDS | March Down Reception Sidings » EMRCHDS. | |
| MARCHUS | March Up Reception Sidings » EMRCHUS. | |
| MRCHEJN | March East Junction; signals ME3 and ME52, plus the diamond crossing on the Up line. | |
| MRCH | March station. | |
| MRCHMPD | March TMD » EMCHTMD. | |
| WHTMLDC | Whitemoor Yard » EWHTMOR. | |
| WISBECH | Wisbech » EWISBCH. | |
| MRCHWJN | March West Junction; signals ME5 (from March station only), ME48, and ME26. | |
| WHTLSEA | Whittlesea. | |
| PBROE | Peterborough East » EPBROE. | |
|
| ||
| BALDOCK | Baldock » EBALDCK. | |
| ASHWELC | Ashwell & Morden. | |
| K977245 | Royston S K977/245 (reverse); use for reversing behind K977 on the Down or K245 on the Up. | |
| ROYSSHR | Royston Sherriff's siding » EROY249. | |
| ROYSLP | Royston Down Loop; can be entered at either end » EROY244 to depart towards Baldock. | |
| K246 | Royston S K246 (reverse); use for Down to Up reversals. | |
| K247 | Royston Up Siding » EROY247. | |
| ROYSTON | Royston; station. | |
| MELDRTH | Meldreth. | |
| SHPRTH | Shepreth. | |
| CAMB551 | Shepreth north (reverse); use for reversing from the Up to the Down line. | |
| FOXTRC | Foxton Cement (Barrington LR) » EBLR. | |
| CAMB554 | Foxton shunt spur. | |
| FOXTON | Foxton; station, including reversing via signal 556. | |
|
| ||
| DULNGHM | Dullingham » EDULL. | |
|
| ||
| CHPNJN | Chippenham Junction; do not use for trains via Dullingham » ECHIPJ. | |
| SNLWLS | Snailwell (sidings) » EFIRM or EKING depending on the siding. | |
| SNLWLRV | Snailwell (reverse); use for reversing into the sidings. | |
| SOHAM | Soham; signals 488 and 491. | |
The following problems are known about in this release.
This section will be updated as bugs are reported.
A brief description of the various "splash screen" photographs.
|
|
The Barrington Light Railway - the exchange sidings taken from the Cement works end and looking towards Foxton. |
|
|
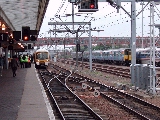
A ONE service to Cambridge in the northbound platform at Whittlesford. |
|
|
Whittlesford station, showing the turnout into the Down Goods Loop, the sidings, and the rear of signal 82. |
|
|
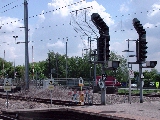
Signal 527 at the exit from CIBA-Geigy, seen from the far side of the main line. |
|
|
The section of Cambridge panel covering the area just north of the station, showing the Down Goods Loop, the main lines, and Carriage Sidings 1 to 5. |
|
|
The section of Cambridge panel covering Ely station. At top left is Bannolds AHB and at top right the CCTV for Ely station level crossing. The line along the bottom is the Ely-Ipswich branch, showing the points at Soham. |
|
|
A view over Cambridge station from the signal box. The reflected lights at the top are actually on the signal panel. Trains are visible on platforms 1 and 2 and Reception Line 1; the old Coalfields sidings are in the foreground. |
|
|
The main Carriage Sidings, with signal 721 in the left foreground. The line at front centre links sidings 5 and 8; it is not signalled and not shown in the simulation. |
|
|
The north end of Cambridge station, with signal 710 in the foreground, platforms 4 and 5 at top left, and the loco sidings at top right. |
|
|
Looking north on platform 3 at Ely; signals 283, 285, and (on the right) 287 are visible. The line is closed by an engineering possession. |
|
|
Another view of signals 283 and 285. The station level crossing barriers are visible on the left, either side of the OHLE support. |
|
|
A ONE service from Ipswich runs into platform 3 at Ely. Signals 274 and 276 are visible in the foreground, and 270 and 272 in the background. |
|
|
The central scissors crossover at Cambridge with an Up train in platform 4. Signals 161 and 163 are visible in the foreground, and trains are stabled on Reception Lines 1 and 2. |
|
|
A service to Ipswich is about to depart platform 6 at Cambridge. Signal 171 is showing yellow plus "M" for the Main Line (to Coldham Lane Junction). |
|
|
Littleport signal box, the fringe box on the line to King's Lynn. |
|
|
A train to King's Cross sits in platform 1 at Royston, with signal K253 - at the exit to the Down Loop - in the foreground. |
For those interested, here are some statistics about the simulation.
In the following table, the four columns are:
| CA | controlled by Cambridge PSB |
|---|---|
| K | controlled by King's Cross PSB |
| Other | controlled by other signal boxes |
| GF | controlled by ground frames in the area |
| CA | K | Other | GF | |
|---|---|---|---|---|
|
| ||||
| Controlled signals (257) | 217 | 15 | 20 | 5 |
| Main without subsidiary | 110 | 4 | 12 | |
| Main with subsidiary | 36 | 5 | 6 | |
| Fixed red plus subsidiary | 1 | |||
| Shunt signal, always shown | 19 | 4 | 2 | 3 |
| Shunt signal, can be hidden | 51 | 2 | 2 | |
|
| ||||
| Automatic signals (160) | 86 | 18 | 56 | |
| Aspect shown | 52 | 6 | 8 | |
| with emergency replacement button | 16 | 2 | ||
| Aspect greyed out | 10 | 42 | ||
| Distant / Repeater | 18 | 6 | ||
| Limit of Shunt, can be hidden | 6 | 1 | 1 | |
| "A" (automatic working) buttons | 69 | 1 | ||
| Yellow (warning route exit) arrows | 4 | |||
| Grey (route exit not at a signal) arrows | 33 | 2 | 3 | 3 |
| Grey (additional route exit) arrows | 18 | |||
|
| ||||
| Routes (639) | 563 | 39 | 30 | 7 |
| Main | 214 | 11 | 22 | |
| Calling-on | 47 | 4 | ||
| Warning | 9 | 5 | ||
| Shunt | 293 | 19 | 8 | 7 |
|
| ||||
| Points (184) | 150 | 17 | 14 | 3 |
| Single-ended | 44 | 1 | 10 | 3 |
| Crossovers | 53 | 8 | 2 | |
The signal with the most routes from it is 147, with 19 different routes to 8 destinations, followed by 149 with 14 routes to 7 destinations. The signals with the most destinations reachable from them are 171, 173, and 175, each with 13 routes to (the same) 12 destinations.
There are 572 track circuits displayed in the simulation; of these, 40 in the Royston area and 23 in the March area are not shown on Cambridge panel. 13 of these track circuits are split 3 ways on the ground (that is, 3 track circuits are shown as a single one on the panel), two are split 4 ways, one is split 5 ways, and 44 are split 2 ways. There are a further 20 track circuits from the King's Cross simulation that are used for chaining but are not displayed, 38 hidden track circuits on screen 6, and 56 other locations within the simulation that can hold trains but do not have their status displayed (for example, within sidings).
There are 316 train describer berths shown on the screen (one shown in two places). In addition there are 43 hidden berths and the 6 "on duty" indications.