SimSig Royston was the first simulation I ever wrote. This page describes version 4.1; version 4.0 was a major rewrite to work with the Loader and to take account of new information that I have obtained, while 4.1 adds further realism.
In real life, Royston is part of the area covered by King's Cross PSB. However, technical reasons meant that the original SimSig King's Cross wasn't able to cover it and instead ended at Baldock. I therefore wrote SimSig Royston to cover the missing section, as a good starter simulation for people new to SimSig, and as a good starter simulation for me to learn the techniques of writing simulations.
The area covered by SimSig Royston is also part of SimSig Cambridge.
As ever, my thanks to Geoff and Mike for teaching me how to write simulations, to all the people who provided information, and to the beta testers.
SimSig Royston simulates the Royston area in about 1980, shortly after the transfer to King's Cross PSB in 1976. The Cattle and Corn Mill Sidings have already been removed, but the complex of sidings and yards on the down side remain untouched. However, the main lines in the simulation are electrified throughout even though in real life the electrification was only extended from Royston to Cambridge in 1988. Speed limits are those in use in 2012.
Unlike previous releases of SimSig Royston, all signals have their appropriate prefix (K or CA).
The area covered by SimSig Royston runs from a point between Baldock and Ashwell & Morden at the south-west end to just past Meldreth station at the north-east end. The whole simulation represents about 10 miles of line, but all the activity takes place in the mile around Royston station.
The Up direction is towards Baldock and the Down direction towards Cambridge. Which is leftwards and which is rightwards depends on the option chosen at startup. The actual line runs roughly north-east (Down) to south-west (Up), though with a curve just north-east of Royston station meaning the Cambridge end is more northerly and the Baldock end more westerly.
Outside the Royston area the line is simple double track with normal left-hand running. Both platforms at Royston are bidirectional with crossovers at each end. There is an extensive network of sidings and yards, mostly unsignalled, on the down side and a single siding on the up side. Two automatic level crossings are also monitored by the signaller.
The general speed limit is 80 mph on the Baldock side of Royston, 90 mph on the Cambridge side, and 50 mph (with easements for EMUs) through the station itself. The two trailing crossovers are 30 mph and the two facing ones 25 mph. Yards and sidings are normally 10 mph.
The EMU speed class is recognized by the simulation for the easements; other speed classes may be set but will be ignored.
The two running lines, the crossovers between them, and the Up Siding are equipped with AC overhead. All the sidings and yards on the Down side are unwired.
The area on the down side on the Baldock side of the station is the most complex part of the simulation. There is a third track, known as the Down Loop for most of its length but the Down Siding at one end. Branching off it are four separate goods yards; starting at the station end:
The sidings are mostly unsignalled and non-track-circuited, so trains can't be controlled directly by the signaller. Instead there is a shunter who must be telephoned with instructions.
When a train for one of the yards arrives, it must be signalled on to the Down Loop in the normal way. Use one of the following combinations of signals:
When a train is ready to leave the Freight Depot or the Grain Siding, the shunter will telephone for permission to depart. If granted, the train will enter the simulation and, if possible, proceed to K249 or K224 signal. If the points can't be set for some reason, the train will just sit at the yard exit until you phone the shunter and tell them to let the train out. Similarly, when a train is ready to leave the Down Siding towards K249 or Dalgety Siding or the Down Loop towards K244, you must phone the shunter to get the hand points set and wave the train forward. Once at K249 or K244 the train will phone if delayed in the normal way.
Because of its location, Sheriff's Siding is more complicated; trains need to be reversed in the Down Siding on their way in or out (this reversal should be included in the train's timetable). So the steps required to get a train into Sheriff's are:
Be warned that the shunter is a bit bolshie and won't use their initiative; they will only set the points or wave trains around when told to. In particular, they'll quite happily let you signal a train forward and send it to the wrong place (but, again, see the options below).
The set of 8 train berths near these yards is the "scratchpad". See the startup options for details of how this works.
Warning: the location called "Sheriff's Siding" in previous versions of SimSig Royston turned out to be the Grain siding. This will affect old timetables; see below for more details.
Until the line towards Cambridge was electrified, the service was split into two with EMUs from London terminating at one end of platform 1 and DMUs from Cambridge terminating at the other end; passengers would then walk between them (or run if their arriving train was late). Rather than having full signalling for this, there were neon "STOP HERE" signs facing each ways suspended from opposite sides of the road bridge crossing the centre of the platform.
The signs are shown as black symbols on platform 1; when lit, the indication shows white. Next to them are exit arrows; a route can be set up to this arrow in the same way as up to the exit signal and either the main or subsidiary aspect will clear as appropriate. Trains will proceed up to the sign and stop there. The sign will go out when the rest of the route times out after the train has been in the platform for two minutes; a train can then be signalled in (either to the sign or up to the other train to join) from the other end.
Drivers are instructed not to pass the sign, even after it goes out, until the signal at the far end of the station clears.
Platform 1 is 247 metres long and platform 2 is 169 metres. At the Up end the signals are at the end of the platform. At the Down end, signal K981 is 94 metres beyond the end of platform 2 and signal K983 is 116 metres beyond the end of platform 1. In each case the two track circuits exactly cover the platform; the boundary between them is 183 metres from K980 and 116 metres from K978.
These lengths are exact and do not allow for stopping space.
The following yards use depot capacity control:
| Depot or yard | Capacity | Maximum length |
|---|---|---|
| Freight Depot | 240 m | 140 m |
| Sheriff's Siding | 250 m | 180 m |
| Grain Siding | 400 m | 300 m |
Other capacities are:
| Down Loop (clear of Freight Depot point) | 103 m |
| Dalgety Siding | 220 m |
| Down Siding | 140 m |
| Up Siding | 220 m |
The scenarios are self-evident.
The following options are available at startup.
There are no hot keys.
SimSig Royston can be chained with SimSig King's Cross. For chaining purposes it is treated as "Cambridge".
The supplied timetable is based on the workings of Summer 2003 plus a couple of imaginary goods trains.
The normal train describer 1A23 system is used. As well as the normal regional and inter-regional ones, the following local route letters are used on the line:
| C | King's Cross to/from Cambridge |
|---|---|
| R | Trains originating from or terminating at Royston |
| T | King's Cross to/from Ely and King's Lynn |
In 2003 the passenger service was operated by Prism Rail (a part of National Express since 2000) under the name "West Anglia Great Northern". Because of franchise changes, in 2004 the service was renamed "WAGN". In 2006 the route was moved to the Thameslink franchise operated by First Capital Connect.
The service consists of a mixture of fast and stopping trains running at least as far as Cambridge, though a few services start at Royston in the early morning. The "Cambridge Cruiser" services pass through the station without stopping. Trains are operated by a mixture of class 317 and class 365 EMUs, though class 313 can be found on the Royston originators.
Before electrification to Cambridge in 1988, there was a service of class 312 EMUs between King's Cross and Royston and a rather less frequent service of DMUs from there to Cambridge. In general the London trains turned round in platform 1 if connecting to a Cambridge train and platform 2 if not.
This section lists the internal codes (which in many cases are TIPLOC codes) for the timetable locations in the simulation, and also provides a brief description of the less-obvious locations. These codes are used when using the timetable converter.
When a train enters the simulation a different code - an entry point code - is used. These codes are shown in italics following a » symbol. In general, the entry location should not be the first location in the train's timetable as well.
| BALDOCK | Baldock » EBALDCK |
| ASHWELC | Ashwell & Morden |
| K249G | Grain siding » EROY249 |
| K249S | Royston Down Siding |
| K977245 | Royston K977/245 (reverse); both tracks; use for reversals only |
| K247 | Royston Up Siding |
| ROYSSHR | Sherriff's siding » EROYSHR |
| K246 | Royston K246 (reverse); use for reversals only |
| K244D | Dalgety siding |
| K244F | Royston Freight Depot » EROY244 |
| ROYSLP | Royston Down Loop |
| ROYSTON | Royston |
| MELDRTH | Meldreth |
| SHPRTH | Shepreth » ESHPRTH |
Warning: timetables built with previous versions of SimSig Royston will have problems with trains using Sheriff's siding and the Down Loop:
A brief description of the various "splash screen" photographs. All were taken in March 2005.
|
|
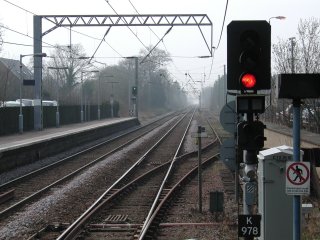
The view towards London from the end of platform 2. K978 and the crossover into the down loop are in the foreground, with K980 visible at the end of platform 1. |
|
|
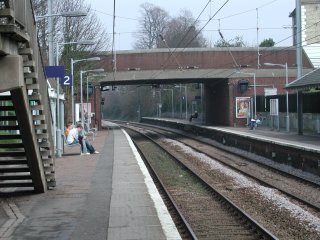
A view along the station from under the footbridge. The "STOP HERE" signs were mounted on the right hand wall of the road bridge in the middle distance. |
|
|
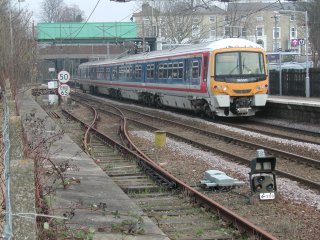
Unit 365 511 departs from platform 1. The station end of the Down Loop and K253 are clearly visible, with the back of K978 immediately above the speed limit signs. |
|
|
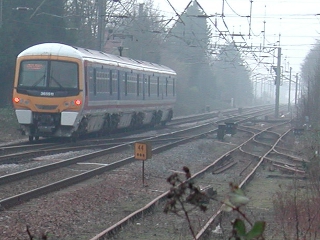
Unit 365 511 passes signals K246 and K244. The running line crossovers and those to and from the Down Loop are visible, as are the remnants of the Dalgety Siding and Freight Depot. |
[Mantis 19785] A train description should normally step directly from signal K977 to K980 or K983. It should not normally step to K246.
[Mantis 19856] There should be a single train description berth shared between signals K245 and K976.
[Mantis 20002] On certain routes the signal should revert to red when the second track circuit in the route is occupied. These signals currently revert to red when the first track circuit is occupied.