
or

When a train is approaching a divergence in the track (such as a facing junction) the driver needs to be aware of this for two reasons:
While traditionally the former reason has been seen as most important, today's penalty regimes have made the latter more significant than in the past.
One of the purposes of signalling is to warn drivers of impending junctions for these two reasons. Here we discuss the way in which it is done in standard Railtrack signalling.
Note: in most of the diagrams that follow the aspects have been drawn with the bottom three lamps in the same place. This has been done to conserve space; the real signals continue to have one head for each colour.
For a long time junctions were signalled using only the standard four
aspects plus a junction indicator. The driver was "warned" of a
diverging route at a junction by making him think he was going to need to stop.
If the line was signalled for straight ahead the signals operated normally:
or
The arrangements described here only apply to a diverging route.
The initial system, and still the commonest one in use today, is "approach
control from red". In this system the junction signal is held at red until
the train is close to it ...


when it suddenly changes to
green with a junction indicator:
By the time this has happened, the train will be travelling
very slowly (the signal usually changes just after the train has passed the AWS
inductor, so that the driver still has to acknowledge the warning) and there is
no problem in conforming to the speed restriction through the junction.
A refinement of this is that the signal changes to double yellow as soon as
the driver will have a clear view of it and then changes again to green once the
AWS inductor has been passed:


The earlier change means it is
not necessary to brake the train so much. This is only permitted if the junction
indicator will be clearly visible, and the change must be delayed if necessary
to ensure this.
Of course, all these aspect changes assume that the line is clear ahead. If
a signal is being held at red for some other reason, the signal can only change
to the appropriate aspect:
The above arrangement works very well when the divergence has a very low speed limit such as 15mph. It is less useful with a 30mph or 40mph turnout, and ridiculous with a 70mph or 100mph one. So the next development was to force the train to slow down but not as much.
This is done by holding the signal after the junction at red:
When the
driver sees the double yellow signal he will be expecting to stop at the signal
marked X. By the time that the junction signal comes into view the train will
have slowed to some extent (say from 100mph to 60mph) and it will be easy to
conform to the speed limit through the divergence. Again, the junction signal
may change to double yellow and then to green as the train approaches it.
This arrangement is only allowed where there is no possibility of a train being unable to brake in time for the turnout. This is discussed further below, under flashing aspects. For obvious reasons it is normally only permitted on four aspect lines, though an isolated double yellow may be added on a three aspect line where this makes sense.
At some junctions the diverging route may have the same speed limit as the
main line. This can happen either because the main line speed is low (a 40mph
turnout on a 40mph line) or because special high-speed turnouts have been used
(such as the 125mph turnouts at Colton Junction south of York). In these
circumstances there is no need to warn the driver of the approaching divergence
and so all signals remain green:
Provided that the junction signal is a reasonable distance from the actual divergence, it may have a speed limit up to 10mph below that of the main line while still using this arrangement.
Where the same junction signal guards more than one divergence, each is signalled independently. So it might well be that one diverging route has no controls, a second uses approach control from yellow, and two more use approach control from red. However, all routes signalled using approach control from yellow must have speed limits within 10mph of each other.
The techniques described above sufficed until the introduction of the HST (also known as the Inter-City 125). These trains were designed to be able to stop from 125mph in the same distance as any other train could stop from 100mph. The problems occurred when these met approach control from yellow.
Imagine an HST proceeding at 100mph on a clear day. The driver sees a double yellow signal. He knows that his brakes are capable of stopping him in well under the full braking distance, particularly with a clean, dry, rail, so he continues at the same speed. The next signal is just out of sight around a curve, and as he enters the curve he starts braking gently in order to stop in two signals time. Suddenly he is faced with a junction indicator and the need to brake hard to 70mph for the turnout.
Even if he can brake safely, it is not a nice position to be in and the drivers, not surprisingly, complained. After all, they were driving safely and according to the rules - the driver in the example could have safely stopped before a red signal. It is the overloading of the system with a new meaning that was the problem.
The solution was to introduce two new signal aspects for high-speed junctions:

|
Next signal is showing single yellow with a junction indicator. | 
|
Next signal is showing flashing single yellow. |
These new aspects are used to provide the driver with warning of a
divergence. On a three aspect route the single flashing yellow appears at
braking distance from the junction:
while on four aspect lines the
driver receives two warnings:
In both cases it is forbidden
to have other than the exact arrangement shown. Depending on the local
circumstances, the signals ahead of the junction on either route may be left
uncontrolled (as shown here) or may be held at red until the train approaches
the junction signal. This is done if there is a danger of the driver "reading
through" and ignoring the aspect of the junction signal.
Once again, once the junction indicator is clearly visible it may step up to
the appropriate aspect for the state of the line ahead:
In more complex cases there are a number of rules that apply to flashing yellow aspects.


We are now seeing layouts where little or no braking is needed for the diverging route. For example, at Airport Junction the turnout speed is close to the maximum speed for those trains diverging. In this situation flashing aspects have the disadvantage of implying to the driver that the speed needs to be reduced. On the other hand, an unrestricted junction gives the driver no advance warning of which route is set - since only one of the two routes is electrified, this can be a serious matter.
To solve this the splitting distant has been introduced. These signals have one head for each route at the junction ahead, and each head shows an appropriate aspect.
On three aspect lines a single splitting distant is used at the signal before the junction. On four aspect lines an inner splitting distant is put at this point and, if needed, an outer splitting distant is put at the signal before that (the outer splitting distant is not needed if the inner provides sufficient warning for all trains to stop safely if the wrong route is set). Each signal has one head for each important route (see below for more about this). In the following diagrams the actual heads are shown for two cases; the arrangements for other situations can easily be deduced.
| One diverging route to left | Two diverging routes to right | |
| Inner splitting distant |  |
 |
| Outer splitting distant |  |
 |
| Splitting distant (3 aspect) |  |
 |
The red lamp is used when the splitting distant signal shows Stop. If the junction signal shows Stop, the inner splitting distant shows a single yellow and the outer splitting distant a double yellow, both using the lamps directly above the red. The interesting situation is when the junction signal is cleared:
So the aspects actually shown by the signals are:
| One diverging route to left; signal ahead of junction at red |
Two diverging routes to right; signal ahead of junction not red | ||||
|---|---|---|---|---|---|
| Divergence | Main route | Main route | First divergence | Second divergence | |
| Inner splitting distant | 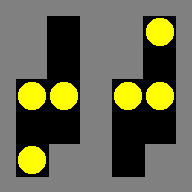 |
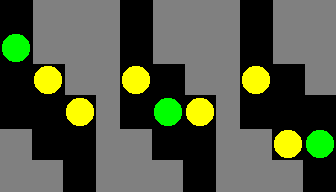 | |||
| Outer splitting distant | 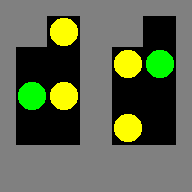 |
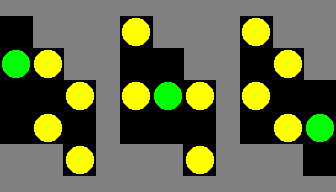 | |||
| Splitting distant (3 aspect) | 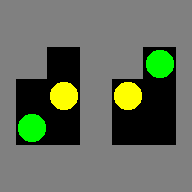 |
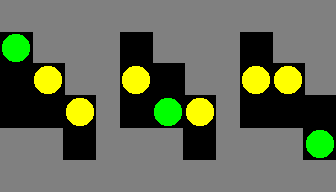 | |||
Notice how the horizontal position of the heads indicates the direction taken and the vertical position shows the relative speeds (in the right hand set of diagrams the diverging routes have different speed limits; if they were the same, the rightmost head would be raised level with the central one).
We can now see how the aspects look in sequence:

Incidentally, a few early
installations used a Preliminary Junction Indicator - a theatre
indicator showing a white arrow - instead of an outer splitting distant. The
indicator was mounted on its own before the splitting distant and was lit
whenever a route was set beyond the junction:

but:
Splitting distants can be used with any diverging speed, since the driver gets an unambiguous warning of the state of the junction ahead. In practice only routes with a high diverging speed are given their own heads, and slower routes are signalled using approach release from red. It is important to note that flashing aspects or approach release from yellow must not be used with splitting distants (thus, for example, an inner splitting distant cannot show flashing single yellow).Splitting distants can, however, appear as part of a more complex layout. In particular, the following are all allowed.
Splitting distants followed by flashing yellows:


Splitting distants preceded by flashing yellows:


Overlapping splitting distants:


This article has covered the existing junction signalling arrangements. In 1998 Railtrack published new proposals for a single system that can be applied to all junctions.
 Index of
articles.
 Back to the signalling index.
 Back to the rail index.
 Back
to Clive's home page.